Essential Tips for Hiking the Manitou Incline (Plus My Personal Experience!)
The Manitou Incline in Colorado Springs is a bucket-list challenge for many adventure seekers!
Known for its intense 2,000-foot vertical gain over less than a mile, the Incline is not your typical hike—it’s a steep, stair-step climb that tests your endurance and willpower.
In this guide, I’ll share tips for hiking the Manitou Incline, from how to prepare to must-have gear.
Plus, at the end of this blog post, I will share my personal experience of tackling this challenging yet rewarding hike!
What is the Manitou Incline?
First, let’s dive into what the Manitou Incline is and why it is on so many people’s bucket lists!
The Manitou Incline is a famous, challenging hike located in Manitou Springs, Colorado, about a 15-minute drive from Colorado Springs.
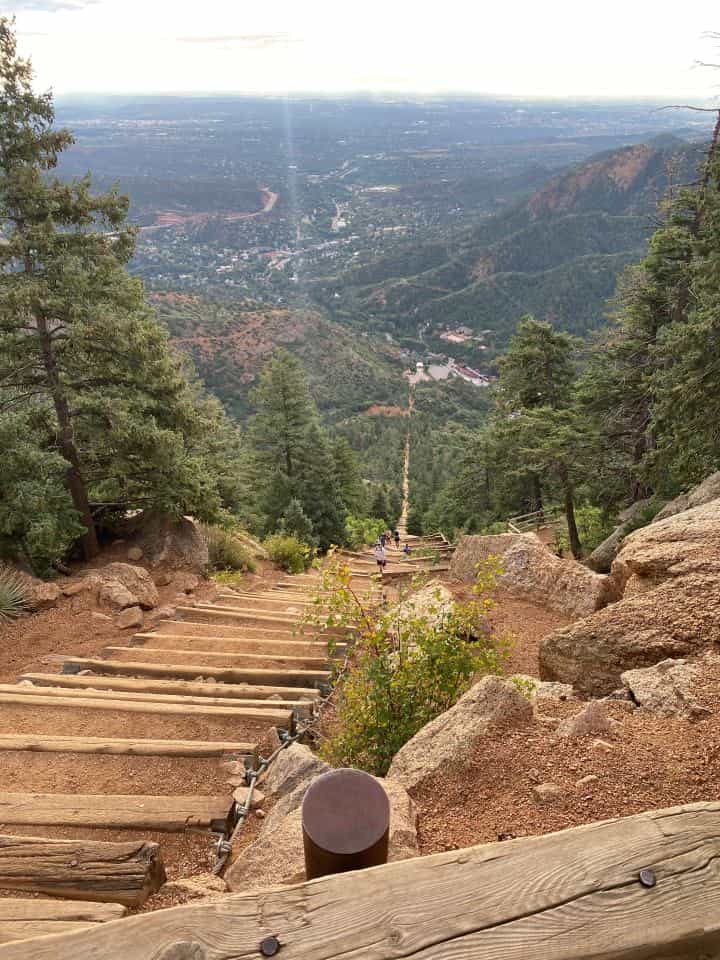
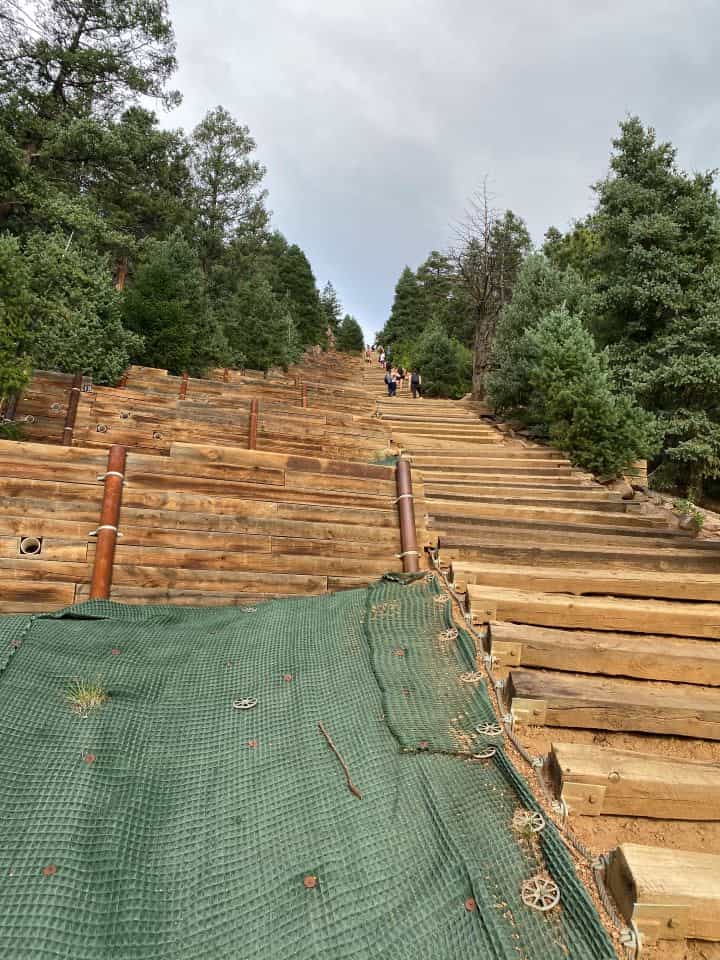
This steep trail is built on an old cable car route, and it is a steep and direct ascent that gains over 2,000 feet in elevation in less than a mile.
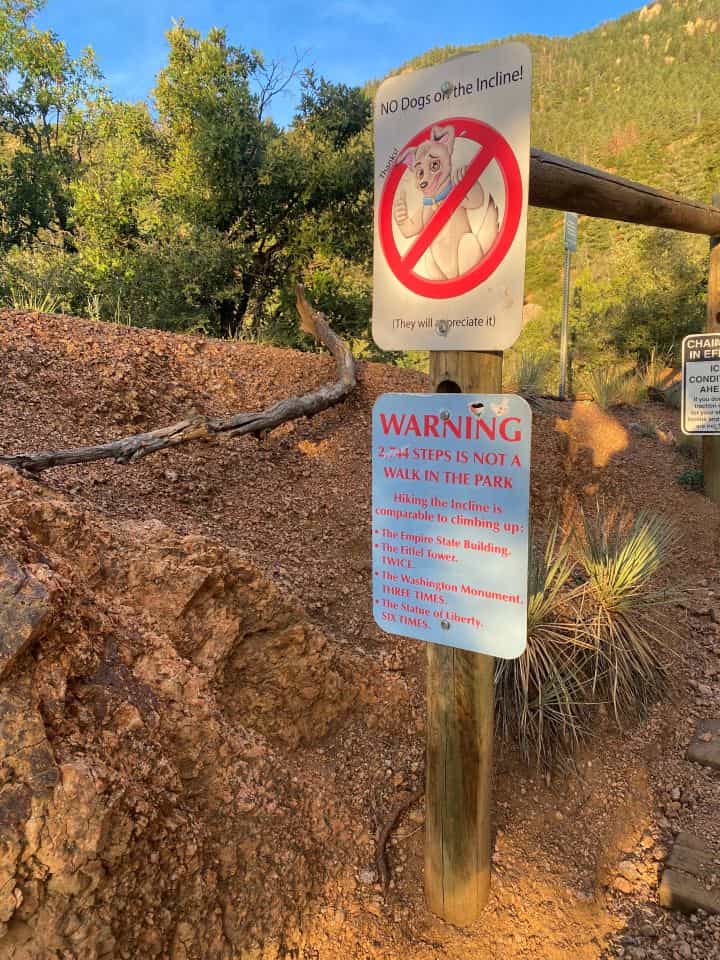
It has approximately 2,744 steps that you will climb, which vary in height and steepness.
Cool fact – the steps are made from the original railway ties!
While the trail is only 0.88 miles from the base to the summit, the extreme incline, which reaches a 68% grade at some points, makes it an intense workout.
Starting at the base, you’ll see the stairs stretching almost vertically up the mountainside, which can look extremely daunting at first glance.
As you begin, the hike starts off with a moderate slope that intensifies, with the steps getting steeper and narrower as you progress.
About halfway up, there’s a “bailout” point where you can descend down the Barr Trail if you are not up to completing the entire hike.
Once you reach the summit, you’re greeted with breathtaking views of Colorado Springs and the surrounding mountains!

12 Tips for Hiking the Manitou Incline
Here are some things you need to know to be prepared for hiking the Manitou Incline!
1. Make a Reservation in Advance (It’s Free!)
You will need to make a reservation in advance to hike the Manitou Incline.
Good news though – it is totally free!
I recommend making your reservation at least 2 weeks in advance to ensure you get your desired date and time. I noticed that the early morning reservations filled up the fastest.
There are 45 open slots for every 30-minute increment.
The reservation system has been put into place to help control the crowds and preserve the trail.
Be sure to bring proof of your reservation—either printed or on your phone.
You can make your reservation here.
2. Go Early to Beat the Crowds and Heat
I highly recommend making your reservation for early in the morning, 7:00 am or earlier.
We got there a little after 6:30 am for our 7:00 am reservation.
No one was at the start of the hike to check our reservation but I am pretty sure there is usually someone there – maybe later in the morning or afternoon.
So, be sure you have the reservation with you either printed out or on your phone just in case.
I recommend doing the Manitou Incline in the early morning to beat the crowds, making parking easier and less traffic on the trail.
Also, the temperatures are much cooler in the morning, allowing you to avoid the daytime heat which would make the incline even harder to complete.
3. Bring Plenty of Water (At Least 2 Liters per Person)
The Incline is a physically challenging workout, and you’ll need plenty of water to stay hydrated!
I recommend bringing at least 2 liters of water per person.
We bought two large water bottles for each of us from the gas station and put them in our backpack.
Here is the backpack we brought that collapses into a smaller bag – making it easy to fit in your luggage.
I highly recommend adding electrolytes to your water to help replenish the minerals you will lose while sweating. My favorite is the LMNT electrolytes (watermelon flavor)!
4. Pack Carb-Heavy Snacks
Snacks high in carbs like trail mix, granola bars, or dried fruit are perfect for fueling your body and keeping your energy up during the hike.
Quick snacks like this are easy to eat if you’re not too hungry but need to eat something to keep you sustained for the hike.
We just grabbed some snacks at the gas station the night before.
I wouldn’t do this hike on an empty stomach as it requires too much energy and takes quite a long time, especially factoring in the hike down the Barr Trail.
5. Wear Good Tennis Shoes (Skip the Heavy Hiking Boots)
The Incline is steep and can be slippery if you have worn out soles, so make sure your shoes still have a decent tread on the bottom of them.
I wore my Hoka tennis shoes, and they worked perfectly.
I would avoid wearing hiking boots since they are not necessary and will just feel heavy on your feet while climbing up the stairs.
6. Bring Sunscreen
With limited to no shade on the trail, sunscreen is essential even if you start early in the morning.
Don’t forget lip balm with SPF as well!
7. Bring Layers
The temperature will change as you gain elevation and start to sweat, so wear moisture-wicking layers that you can add or remove easily.
UPF shirts are a great thing to wear since they are lightweight, breathable, and protect you from the sun.
8. Pace Yourself and Take Breaks as Needed
The Incline climbs nearly 2,000 feet in under a mile, so be sure to pace yourself, take breaks as needed to lower your heart rate, and focus on steady breathing.
We took plenty of short breaks to catch our breath and take a sip of water which made a huge difference in how we felt at the top of the incline.
Since you still have to walk down the 3-mile Barr trail afterward, you don’t want to be too worn out at the top.
Remember, the Incline is challenging for everyone, so listen to your body and go at a pace that works for you!
9. Be Ready for Altitude Changes
With the trail starting at 6,500 feet and reaching over 8,500 feet at the summit, altitude sickness can be a concern.
If you’re new to high elevations, you might feel the effects more strongly. The signs of altitude sickness to be aware of include dizziness, nausea, and shortness of breath.
If you experience these symptoms, take a break, drink some water, and assess if you need to continue.
In order to help prevent this, I recommend tackling the Manitou Incline once you have been in Colorado for a few days so your body has the chance to acclimate to the high altitude.
We did the Manitou Incline on our third full day in Colorado.
10. Take the Barr Trail Down
It is recommended to take the Barr Trail down to avoid having to take the steep and slippery steps down as this can increase risk of injury and falling.
The Barr Trail is 3 miles down and much gentler on your knees.
You will see some experienced hikers taking the stairs down, but most looked like they were training, running up and down as part of their workout.
I know some people are training specifically to beat records on the Incline for how fast it is completed or how many times it is done in a day.
11. Be Mindful of Others
The trail can be crowded, so be mindful of others behind you and step aside if you need a break to let others pass you.
The Incline is a popular hike, so expect to share the trail, but I think that is part of the fun—to all be able to do it together in a way.
12. Listen to Your Body and Don’t Be Ashamed to Turn Back
The Incline is a tough hike even for experienced hikers.
If you feel like it’s too much or you’re experiencing discomfort, there’s no shame in turning back.
It’s a workout, but it should still be enjoyable!
There are a few bail-out areas along the way where you can step off and descend down the Barr Trail.


Where to Park for the Manitou Incline?
There are two different popular parking options – both require payment.
1. Hiawatha Gardens
Hiawatha Gardens parking lot offers a free shuttle from the lot to the trailhead.
The shuttle runs from 6:00 am to 6:00 pm and runs approximately every 20 minutes.
If you don’t want to wait for the shuttle, you can walk the 1.3 miles to the start of the Incline.
2. Iron Springs Chateau
Iron Springs Chateau is the closer option, but it fills up quicker.
It was a little hard for us to find with our GPS at first, but we eventually found it after passing it the first time lol.
It is down Ruxton Avenue, near the Broadmoor Manitou and Pikes Peak Cog Railway.
This option does fill up quicker as there are not as many spots. We arrived a little before 6:30 am on a Friday, and it was steadily filling up.
It is cash-only and is $15 for 4 hours.
It is a short 5 to 10 minute walk to the base of the Incline.
Looking for a Hotel?
Explore Booking.com for your hotel needs – they offer budget-friendly prices and a variety of room types!
Need a Rental Car?
For all your rental car needs, head over to Expedia! It’s user-friendly and offers plenty of affordable options!
Guided Tours/Activities
When it comes to booking guided tours and excursions, my top pick is Get Your Guide!
What to Pack for the Manitou Incline?
- 2 liters of water per person (We got two big water bottles from the gas station for each of us.)
- Electrolyte tablets or powder to mix in your water (I prefer LMNT – watermelon flavor.)
- Energy snacks like trail mix or energy bars (I like these That’s It Fruit Bars)
- Tennis shoes with good grip (I love my Hokas!)
- Layers for temperature changes (UPF shirts for the win)
- Sunscreen and lip balm with SPF
- Sunglasses and a hat to shield from the sun
Important Details to Know
- Summer Hours (May 1st – October 31st): Open from 6:00 am to 6:00 pm
- Winter Hours (November 1st – April 30th): Open from 6:00 am to 3:00 pm
- No Dogs Allowed: Pets aren’t allowed on the Incline.
My Experience Completing the Manitou Incline
My sister and I did the Manitou Incline while we were visiting Colorado Springs in late August!
We went on a Friday morning around 6:30 am to avoid the heat and crowds.
The Climb Up
From the start of the steps to the very top, it took us around 1.5 hours.
We took plenty of breaks to catch our breath and take sips of water to stay hydrated.
The trail is no joke—it climbs nearly 2,000 feet in less than a mile—so pacing ourselves was essential!
Along the way, there are plenty of spots to step aside from the main path and take a breather without being in the way of others.
Taking in the views at each stop was an added bonus—it was pretty cool to be able to look back and see how far we had climbed!
The Incline wasn’t overly crowded when we did it; there was a steady flow of people, but nothing overwhelming.
The atmosphere was very uplifting and there were plenty of friendly and encouraging hikers!
The Descent
After reaching the top, we took the Barr Trail down, a 3-mile trail that provides a much gentler descent than going down the Incline steps – which is discouraged.
The descent took us around 1.5 hours as well.
The path was easy to follow, though it was a bit busier, especially with trail runners.
We found ourselves having to step aside to let runners pass, so that is something to keep in mind if you’re descending during peak times.
The Barr trail gave us some fantastic views and was shaded in parts, making it a pleasant cool-down after the intensity of the Incline.
We were glad to have the gradual descent and smoother ground—it was much kinder on our knees than the steep steps.
Overall Thoughts
Hiking the Manitou Incline was a bucket list experience for me and is a memory that will last a lifetime!
Going early in the morning turned out to be a fantastic decision that I highly recommend.
The cooler air and lighter crowd made the challenging climb more enjoyable.
For anyone considering the Incline, I’d say be prepared, pace yourself, and remember that it’s okay to take breaks along the way.
The Manitou Incline is a tough hike but absolutely worth it. The sense of accomplishment at the top is like no other feeling!
It was definitely the highlight of our trip to Colorado Springs!
Check out my other blog posts about Colorado below!


3 Comments